 As your kids get ready for less tricks and more treats this Halloween, Richela Fabian Morgan is the author of the Duct Tape Series Books:Tape It & Make It, Tape It & Make More, Tape It & Wear It and her newly released book, Duct Tape Bags.
Special to Harlem World Magazine Fabian Morgan provides complete instructions for each project below, including suggested materials and tools.
Here are three projects for you and the family:
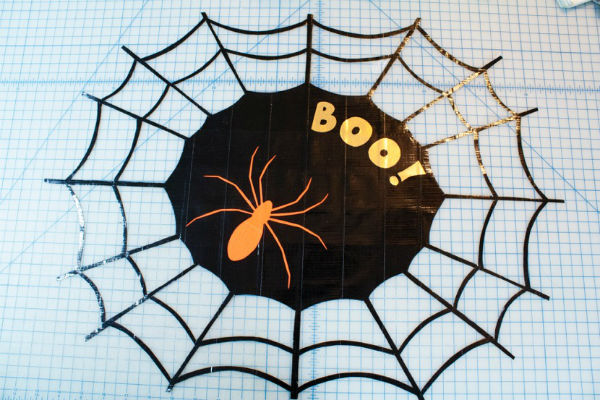
Project #1: Spider Web Door Sign

Materials: black, orange, and gold duct tape, oversized sheet of paper (ideally 18″ x 24″), parchment paper.
Tools: pencil, ruler, scissors, white grease pencil
- Fold the oversized sheet of paper in half lengthwise, then fold in half crosswise. From the folded corner, draw a diagonal line to the opposite corner. You should now have two triangles. From the same corner, draw two more diagonal lines, dividing each triangle in half.
- Starting at the bottom left corner, draw slightly U shaped line upward, connecting to the left end of the diagonal line above it. From this point, draw another U shaped line to the next diagonal line, and repeat until you reach the top right corner of the folded paper.
- Starting approximately 2″ inward from the bottom left corner, repeat step #2.
- Starting approximately 4″ inward from the bottom left corner, repeat step #2. You should now have 1/4 of a spider web pattern.
- Carefully cut out the top two lines of the web pattern, cutting each drawn line approximately 1/4″ thick. Leave the middle part intact. Unfold the paper. This is the web template. Set aside.
- Using black duct tape for the front side and gold duct tape for the back side, make a double-sided duct tape fabric measuring 18″ high and 24″ wide. (See instructional video: https://youtu.be/6YZSNYyy57w )
- Take the web template and place it on top of the fabric. Trace the template onto the fabric. Remove the template and cut the web pattern out of the fabric.
- On the parchment paper, draw a spider. (You can also do a Google search for “spider drawing” and trace any free illustrations.) Cover the drawing with orange duct tape. Flip over the parchment paper and you can still see the drawing. Cut out the drawing. Remove the parchment paper from the back of the spider and place it on the web.
- On the parchment paper, draw “Boo!” in large bubble letters. Cover the drawing with gold duct tape. Flip over the parchment paper and you can still see the letters. Cut out the letters. Remove the parchment paper from the back of the letters and place it on the web.
Project #2: Pumpkin Stickers (Faux Jack O’Lantern)

Materials: black duct tape, parchment paper, pumpkins
Tools: pencil, scissors
- Draw Jack O’Lantern faces on the parchment paper.
- Cover the drawing with black duct tape.
- Flip over parchment paper. You can see the drawing through the parchment paper. Cut out the Jack O’Lantern face pieces using scissors.
- Remove the parchment paper from the back of the face pieces and place on the pumpkins.
Project #3: Masks: Three Different Looks Using the Same Template

Materials: black duct tape, parchment paper, gauge wire
Tools: mask template, grease pencil, scissors
- Print and cut out mask template.
- Make a double-sided duct tape fabric measuring 6″ high and 8″ wide. (See instructional video: https://youtu.be/6YZSNYyy57w )
- Trace the mask template onto the fabric using the grease pencil. Cut out the mask.
- Align the top slits so the eye holes of the mask are almond-shaped. The top of the mask should become rounded and contoured. Close the slits with small pieces of duct tape.
- Pull the side slits of the mask towards each other, which closes up the V space. Hold it in place with small pieces of tape. This should further round and contour the mask.
- On the inside of the mask, tape a 1″ piece of wire across the nose. Then bend the mask in half vertically.
Richela Fabian Morgan began her duct tape odyssey 8 years ago with a simple bi-fold wallet, before writing the best-selling crafting books Tape It & Make It, Tape It & Make More, and Tape It & Wear It. She is an indie crafter specializing in paper, adhesives, and found materials. Her newest duct tape crafting book, Duct Tape Bags, is available nationwide. For more information, please visit, www.RichelaFabianMorgan.com. For more fun duct tape projects, make sure to check out Fabian Morgan’s YouTube Channel, www.youtube.com/user/CraftyRichela.
Become a Harlem Insider!
By submitting this form, you are consenting to receive marketing emails from: . You can revoke your consent to receive emails at any time by using the SafeUnsubscribe® link, found at the bottom of every email. Emails are serviced by Constant Contact


